Sewing a quick-and-dirty pair of overboots for my Polarguard camp booties.
Back in the 1990’s when I took my first winter camping trips I bought a pair of Sierra Designs camp booties insulated with Polarguard synthetic insulation. The booties kept my feet warm in camp after a long day of skiing in leather backcountry boots, but they were too short to keep out snow if I stepped off the packed area in camp and into deeper snow. At the time, Outdoor Research sold some winter booties called Modular Mukluks that had a tall outer shell bootie and an inner insulated bootie made from Moonlite Pile. I ordered a pair of the outer boots and used them with my booties for the next several years. They weren’t a perfect fit, and they were made from coated fabric, so they got a little sweaty with extended use. I always figured that I would sew a better version of them one day, and this winter, with a short backcountry ski trip scheduled for early February, I got to work. Here are a few images to take you through the process.
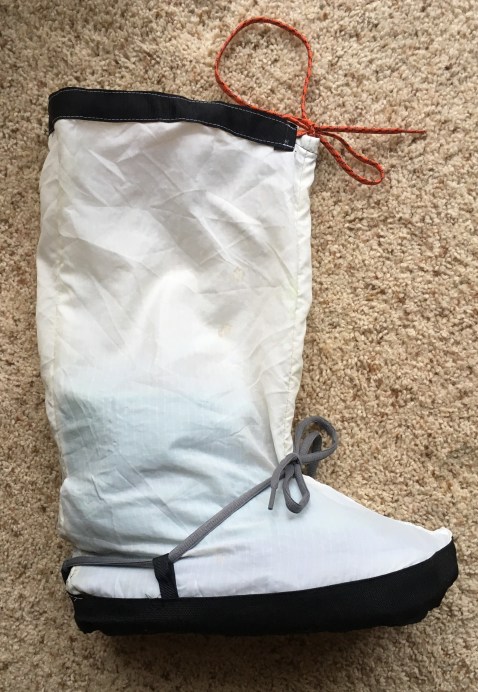
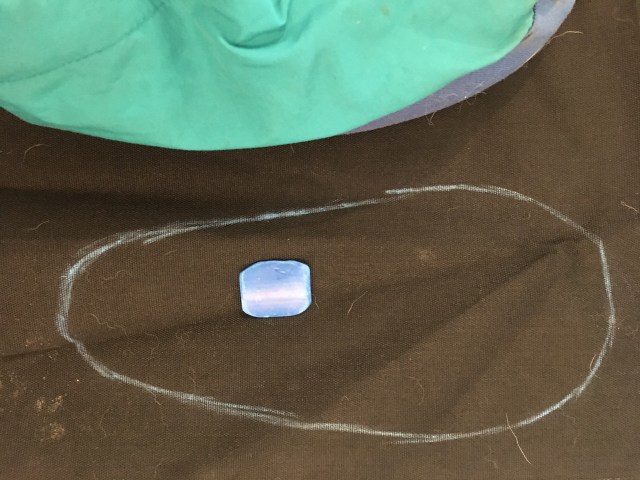
First step: I traced around the outline of the sole of my Polarguard booties with tailor’s chalk and cut about a half inch outside the line to allow for a seam. Fabric is waterproof coated Cordura nylon.Two long strips would form the sides of the sole of the bootie. They’re 2″ tall and sized to the circumference of the sole: 29″ I cut them an inch long to allow for a seam.Soles and sides cut out and ready for assembly.Hemming the sides of the sole top and bottom before stitching to sole.Sole and sides pinned together. It would take some careful stitching to connect these with a minimum of wrinkles.Test fitting the sole to the bootie before proceeding with the upper. Webbing tabs in lower left of frame will secure laces on completed booties.Tabs attached to completed sole. Next step is to create a pattern for the upper.Tracing a quick and dirty pattern onto pattern fabric. The 1″ squares simplify pattern making.Completed pattern. Transferring lines onto lightweight uncoated nylon ripstop for the upper. This fabric was salvaged from a damaged tent. Pattern is 16″ wide and 20″ high.Fabric marked and ready for cutting. I cut four identical pieces for the uppers.Uppers sewn together at the front seam. The seam is simple: I stitched the pieces together to secure the seam and then folded the ragged edge of the fabric underneath so it wasn’t exposed to wear. I then stitched the seam a second time. The bottom edge received a simple hem, turned outward toward the inside of the sole.Adding a hem to the outside of the upper where it will be stitched to the sole.The upper was then turned rightside out and carefully fitted to the sole and pinned in place. I centered the front seam of the upper on the front center of the sole and worked around the sole with pins toward the back. The bootie is inside the upper in this image to help with correct placement of the upper.Stitching the upper to the sole was challenging. It took time to carefully work around the radius at the front of the sole. I started at the front on each side and worked toward the back to minimize wrinkles. At this point I realized that I had cut the pattern too short to allow for the seams I was using. I would need to piece in a strip of fabric at the rear of each bootie to make up the difference.The rear seam on the completed overboot. I stitched one side first, then carefully matched it to the sole before sewing the second side. The final step was to sew the strip to the sole at the rear of the overboot.With the uppers stitched to the sole I made a simple hem at the top of the overboots and added a ribbon to the top to hold a draw cord.Completed overboot with bootie inside. My first go at laces were a bit garish. I swapped out the lime for grey in the final version.Front of overboot showing mukluk style lace pattern. I simplified this in the final version.Overboot and bootie. A piece of Ridgerest pad was cut to fit inside the overboot to provide extra insulation underfoot.Completed version of overboot with simple tie from rear tab, through side tabs. This tie is sufficient to keep boots from pulling off in deep snow.
Lessons Learned
Boy, am I rusty with a sewing machine. I got it all together but these are certainly not a work of art. My biggest takeaways from the project were that I should leave a greater seam allowance in the future. I had added and inch and a half to the width of the pattern on each side, imagining that 3/4″ of fabric would be plenty at each seam. My clunky sewing used more than this by an inch or two. If I were to redo the upper I would add two inches to the width of the pattern.
The same thing is true of the height of the upper. By the time I was done folding, trimming, sewing and hemming my upper was just the right height to hit above my calf. Cinching down the ties at the front of the boots puts tension on the uppers and pulls them down my legs. It’s not enough of a problem that I have to fix it right away, but at some point I’ll probably add a strip of fabric to each boot to make them a little taller.
With these few reservations I’m pretty satisfied with this quick-and-dirty sewing project. I’ve got some ultralight overboots that will keep the snow out of my booties when I’m hanging around in camp this winter. They’re a better fit than the old Modular Mukluks were and the breathable uppers will shed snow without getting sweaty. I’m going to give them a dose of spray-on silicone water repellent and they’ll be ready to hit the trail.
As this post drops I’m up in the UP for a weekend ski trip to the McCormick Wilderness area. Booties and overboots are in the pack.
If you enjoyed this post, please consider subscribing to Kitchi-Gami.com by using one of the links in the menu on the right side of the screen. On your mobile device you’ll find the links if you scroll to the bottom of the page. Thanks!
Nice work! I had the same idea for my pair of booties after dealing with slush around camp, and just losing too much heat to the sole. The extra CCF sole in the overboot is key. Almost an ultra-lightweight camp mukluk. Helsport makes a similar product, nice and long, too: https://en.aventurenordique.com/helsport-footsacks.html — but it’s cotton/poly. It’s a decent mix, however I think the best would be a design closer to yours and made with silnylon. I’m not convinced the silnylon would trap enough moisture to affect the synthetic insulation in the booties. It’s weird you don’t see more of these “foot bags”. It’s either bulky Neos, mukluks, or neoprene gaiter overshoes.
Nice design. What did you use for the upper fabric? And have you ever tried running lines of Aqua Seal on the lowers, to make the Cordura a bit more non-skid?


Great!€
Nice work! I had the same idea for my pair of booties after dealing with slush around camp, and just losing too much heat to the sole. The extra CCF sole in the overboot is key. Almost an ultra-lightweight camp mukluk. Helsport makes a similar product, nice and long, too: https://en.aventurenordique.com/helsport-footsacks.html — but it’s cotton/poly. It’s a decent mix, however I think the best would be a design closer to yours and made with silnylon. I’m not convinced the silnylon would trap enough moisture to affect the synthetic insulation in the booties. It’s weird you don’t see more of these “foot bags”. It’s either bulky Neos, mukluks, or neoprene gaiter overshoes.
Just found these! Close, but too short.
https://goosefeetgear.com/products/waterproof-over-booties/
Nice design. What did you use for the upper fabric? And have you ever tried running lines of Aqua Seal on the lowers, to make the Cordura a bit more non-skid?
Used some ripstop that I salvaged from an old tent. I have done that with booties. Big help on hardwood floors in a cold house.