
The T-rescue is one of the fastest and most effective methods for helping a paddler recover after a capsize. By focusing on a few specific points, a T-rescue can be executed safely and easily, even on heavily loaded boats.
A version of this article was first published in Sea Kayaker Magazine, April 2004. All photos Scott Lynch.
[There are a number of posts that I’m working on to republish a few Sea Kayaker articles from the early 2000’s. In most cases I no longer have digital images and have to scan the photos from print copies, so image quality will suffer.]
The T-rescue is one of the fastest and most effective methods for helping a paddler recover after a capsize. Many people have learned a basic version of this technique, which involves emptying a swamped kayak across your deck, as part of an introductory sea kayaking course.
Unfortunately, beginning paddlers can find the T-rescue challenging. There are a few details that are important to do correctly. If you fail in these fundamentals your rescues will be slow and strenuous. Improper technique leads to the the T-rescue being characterized as physically difficult or impractical for use on fully loaded kayaks.
This doesn’t have to be the case.
You don’t need bulging biceps to empty a kayak. By focusing on a few specific points, a T-rescue can be executed safely and easily, even on heavily loaded boats. The following suggestions are offered to help make your T-rescues more effective.
Equipment
Bulkheads are a critical safety element of kayak outfitting. This particular T-rescue will not work unless the swimmer’s kayak has a bulkhead behind the seat to limit the amount of water in the kayak and facilitate draining the cockpit. Any rescue is harder to perform on kayaks that have only air bags for flotation. If you’re paddling far from shore, bulkheads are a must.
Deck lines are a tremendous help when executing rescues. They give you something to grab and make is easier to handle a slippery boat in rough conditions or while wearing gloves. Many manufacturers offer these perimeter safety lines as standard on their kayaks. Kayaks without deck lines can be retrofitted easily. It’s worth adding deck lines to your kayak if it doesn’t already have them.
Technique
Before diving into the details of the T-rescue it’s worth mentioning that leadership is an important and often overlooked element of any kayak rescue. As the rescuer, you must be in command.
I always tell the swimmer what to do and when to do it during a rescue, regardless of his or her experience. Hitting the cold water can confuse even and experienced paddler, and it helps to be reminded about what comes next.
Always evaluate the swimmer’s mental status before you begin a rescue. Don’t rush in to help someone who is panicking, or you may find yourself in the water. Keep commands short and direct. For example: “Hold onto your paddle!” “Swim to your bow!” or “Grab my boat here!” or “Wait!”
At the beginning of a rescue, I tell the swimmer to hang onto his paddle and move to the front of his kayak. When I make contact with his kayak’s bow, I tell him to hold onto my boat, pointing to the spot I want him to grab. Ideally, the swimmer will hold my kayak near the bow so I have him in sight during the rescue. If this proves awkward, I may direct him to grab the deck lines behind my cockpit. In rough conditions, it may be safer for the swimmer to hold onto the deck lines of your kayak near the bow, rather than the bow toggle. This reduces the chance that he will be hit with the point of the bow in heaving seas. Keep your commands simple and make sure the swimmer doesn’t let go of your kayak.
I prefer to have the swimmer in contact with my kayak during the entire rescue. This does several things. First, it eliminates the chance of my losing him if I’m somehow separated from his boat. Second, it keeps the swimmer away from the rudder and cables found at the stern of many kayaks. Finally, it keeps him from slowing the emptying process.
The trade off for having the swimmer in contact with your boat is that in strong winds his kayak can blow away quickly if you let go of it after it’s been righted. If this happens your best option may be to get the swimmer up onto your back deck and head for the nearest landing. You’re are not likely to catch the empty kayak with him on the back deck and it’s a bad idea to abandon the swimmer to chase after his boat. No matter what you choose to do, you’ll be in a bad spot.
So, don’t let go!
Once you have practiced this rescue you’ll be able to empty the kayak within about 15 seconds of first contact. For that 15 seconds it is essential that you not lose your grip on the swimmer’s kayak. Before and after emptying the risk of the kayak drifting away in high winds is much lower because the swimmer is holding onto his kayak and creating drag. It’s those 15 critical seconds matter most. Don’t let go.
Other reasons for keeping the swimmer in contact with the rescuer’s boat have to do with efficient technique and safety. One well known version of the T-rescue requires the swimmer to push down on the stern of his kayak to help the rescuer lift the bow and drain the cockpit. If you use the techniques outlined in this article you’ll never need to do this. Your rescues will be faster, you’ll maintain contact with the swimmer throughout the rescue and you’ll keep him away from his rudder and rudder cables if his kayak has them.
It’s worth noting that the old adage of “always three on the sea” comes into play here. You always have more options for rescues when you are paddling with three or more competent paddlers. A group of three can tow an incapacitated paddler and can “anchor” a rescue with a tow line to prevent drifting into danger. With a group of three you can chase down a lost kayak or send someone for help. Consider paddling in a group of three or more if you’re challenging your limits on a trip.

Initial Contact
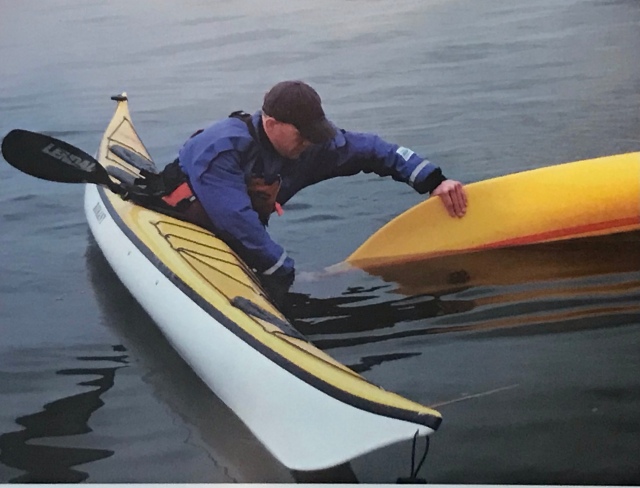
An area where even experienced kayakers may struggle is in making initial contact with the swamped boat. You don’t have to aim right at the point of the swimmer’s kayak. If you do, there’s a good chance you’ll miss. Instead, paddle toward the center of the swamped boat, make contact with the hull and slide down toward the bow. Once you have hold of the bow you can swing the swamped kayak into the “T” position.
It’s important to commit to contact with the swamped kayak. Once you’ve reached the bow, rotate your body toward the capsized boat. Put your near hand well out onto the hull. Once you’ve made contact, don’t let go! This is not the time to fiddle with paddles or other equipment. Regardless of what happens always keep at least one hand firmly in contact with the swimmer’s kayak.
The description here is for a rescue in which the swimmer’s kayak is on your left side. In this case, your left hand is the near hand and will be supporting your weight as you lean over the swamped boat. Your right hand will grasp the point of the bow (or the toggle, if it is at the end of the boat). Lean your weight onto the capsized boat and use it for support. If you commit to this position you’ll find it is remarkably stable. (Figure 1). (For clarity, the swimmer has be omitted from these photos.)
Emptying the Kayak
Emptying the kayak is a four-step process that takes only seconds to complete. The steps are Rotate, Slide, Rotate, Edge.
Rotate
From the initial contact position, push away with your top (left) hand while pulling the bow with your lower (right) hand. (Figure 2.) This action will rotate the kayak to an upright position with almost no effort. Many people make the mistake of pulling up on the bow in an attempt to lift it onto their deck. This is very difficult, as you are lifting the boat and fighting the suction created by the cockpit opening. Instead, roll the boat upright. Don’t worry about scooping water into the cockpit as you do so. We’ll take care of that in a minute.
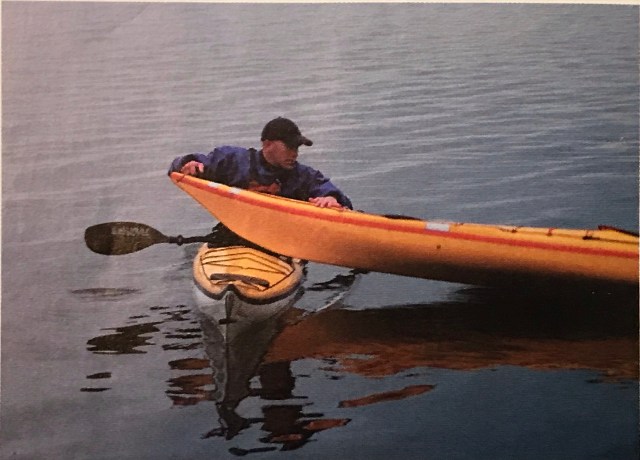
Slide
With the kayak upright it’s easy to slide the bow up onto your deck. In one motion, unwind your torso, pull on the deck line with your left hand and punch outward toward the right with your right hand. In most cases you’ll have hold of the end toggle with your right hand. You can also hold the deck line near the bow.

This is a dynamic motion that requires more finesse than strength. Don’t get carried away and try to drag the cockpit of the swamped kayak all the way up onto your lap. Instead, slide the kayak only far enough that the bow is hanging over the right side of your boat. If your right arm is locked straight at the end of the sliding motion, you’ve gone far enough. (Figure 3.)
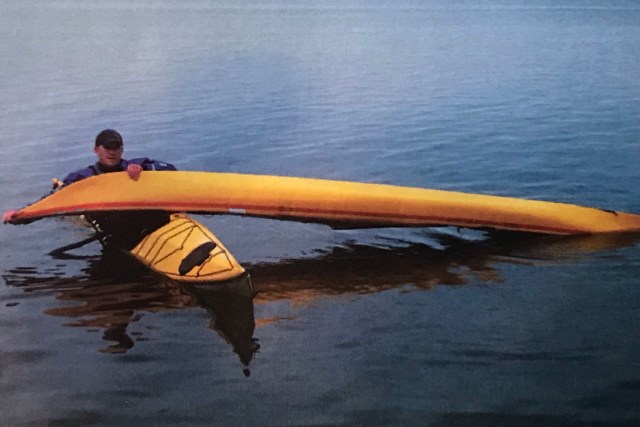
Rotate
Roll the kayak back into an upside-down position. I usually roll the kayak toward myself. This is more secure than rolling it away from your body and reduces the chance that you’ll lose your grip. You may need to reposition your hands to get effective leverage. Deck lines make this much easier. (Figure 4.)

Edge
Most kayaks will be empty at this point, but there’s one more step to be sure. With your right hand on the bow toggle and your left hand on top of the overturned hull, edge your kayak away from the swimmer’s boat.
The swamped kayak gives you enough stability that you can be aggressive with this move. The more edge you give your kayak, the higher the cockpit will lift from the water and the better the kayak will drain. Once you’re fully on edge, rotate the emptied kayak away from your body. Hold the edge until the rescued boat is upright. By holding this position you keep the cockpit of the rescued kayak from scooping water as it is flipped upright. When the empty kayak is upright, set your own kayak back on an even keel. With practice, this maneuver can be done in one, smooth motion, which takes only seconds. The empty kayak can now be slid off your deck and into the water for the swimmer’s reentry. You should practice this technique until you’re comfortable with the timing. If you let go of the swimmer’s kayak while you’re edging there’s a good chance you’ll flip. Keeping a good grip on the toggle and deck lines is critical to maintaining balance. (Figures 5, 6 and 7.)

Getting In

Many rescuers have trouble controlling a swimmer’s kayak as he reenters. It’s critically important to have a solid grip on the swimmer’s kayak before he attempts to climb in. Rotate your body toward the other boat and grasp both sides of the cockpit coaming. Make sure the swimmer waits until you’re ready. Keep a firm hold on the cockpit coaming until the rescued paddler has his feet on the foot braces. Move your hands onto the deck lines in front of the cockpit as he secures his spray skirt. Don’t move your hands from this position until the rescued kayaker can lean on your kayak for stability or is ready to begin paddling again.
As you approach a swimmer and his kayak you’ll need to secure your paddle. I often use a paddle leash and simply drop my paddle during a rescue. One of the best methods for securing your paddle if you don’t have a leash is to set is across the cockpit coaming at your waist and lean forward to clamp it in place with the bottom of your PFD. This takes a bit of practice but is easy once you get the hang of it.
This is also a great way to control the swimmer’s paddle as he reenters his kayak. During the rescue, the swimmer holds onto his own paddle. When you’re ready for him to climb back into his kayak, you can take it from him and tuck it under your PFD. One or two paddles clamped under your PFD and bridging the two kayaks adds stability as the swimmer reenters. After reentry, returning the swimmer’s paddle is as easy as sitting up and handing it to him.
Water in the Kayak and Other Issues
With real world rescues you’ll almost always end up with some water sloshing around in the cockpit after a T-rescue. This is fine. Most of the time when someone flips there’s a decent reason for it. Surf, clapotis, etc. That means that the immediate environment is challenging. You want to get the swimmer back into his kayak and out of the danger area as quickly as possible. You’ll have plenty of time to pump out or sponge out his boat once you’re outside the surf zone or away from that cliff. Don’t waste time trying to get his kayak perfectly dry. Get him back in the boat and out of trouble as quickly as you can.
Likewise, if something doesn’t go perfectly during the rescue, don’t waste time trying to make things just right. If the swimmer grabs your kayak behind the cockpit, roll with it. If the kayaks aren’t pointed in opposite directions at the end of the rescue, carry on. If the swimmer is between the boats when it’s time to reenter, figure out a way to get him back in the boat with a minimum of fuss. Perfect is the enemy of good. Or done. Get the job done and don’t waste time.
Fast and Effective
The best rescue is a fast rescue–one that puts the paddler back into the boat with a minimum of exposure to cold water. The technique outlined here addresses the points most people struggle with in the T-rescue. Many people have trouble lifting the bow of the swamped kayak onto their deck during a T-rescue. If you eliminate the lift from the T-rescue, the rescue becomes much easier. The fine points of technique, like securing paddles during the rescue and holding the cockpit during reentry, will improve the speed and effectiveness of your rescues. As with any skill, practice will improve your performance. Take the time to experiment with these ideas in a controlled setting to see if they work for you. Get confident with your T-rescues–your paddling partners will thank you.
If you enjoyed this post, please share it on your favorite social media site using one of the buttons below. If you want to see more, consider subscribing to our website by using one of the links in the menu on the right side of the screen. If you’re on a mobile device you’ll find the Follow button if you scroll down from here. Thanks!

Funny that you post this now–I am doing a clean and purge and was wondering what I should do with the waterproof point-and-shoot 35mm that we used for this. If you want it, it’s yours!
Also thought of you recently watching a short documentary called “Arc of Aleutia” about some dudes who went surfing in the Aleutians.
Dang! I didn’t think that was all the way back in film camera times. I was hoping you might have digital copies on your computer somewhere.
Pingback: Kayak Rescue Techniques for Safety