

Adding a keel strip is a great way to beef up an aging kayak or prepare a new boat for an ambitious trip. Don’t be afraid to tackle this project at home. The results are well worth the effort.
A version of this article was first published in Sea Kayaker Magazine, October, 2004. Images were recovered from a print copy of the article.
Composite kayaks are much tougher than people think. A solidly built fiberglass boat is perfectly capable of landings on rocky shores and will hold up for years with some simple maintenance. But even the best cared-for kayak will eventually start to show signs of wear. Most boats wear along the keel line, particularly at the ends.
Whitewater canoeists are used to applying skid plates to these areas. Many kayakers in Great Britain, where rough landings on rocky shores are common, apply a bow-to-stern keel strip to their kayaks for extra protection.
A keel strip is essentially a piece of fiberglass or polyester tape, saturated with resin and covered with thickened gel coat. The process of applying a keel strip involves masking and prepping the hull, laying on the fiberglass tape, and finishing over the tape with gel coat. The whole project can easily be completed in an afternoon if you have the materials assembled and a warm place to work.
Adding a keel strip is a great way to repair a damaged composite kayak and is a good preventative measure if you’re planning a long expedition in exposed conditions. Here’s how you do it.
Preparing the Hull
The first step is to make sure the hull is clean and free of contaminants. I usually give the hull a wipe with acetone before masking. As with any fiberglass project, make sure to take proper precautions to protect yourself from vapors and contact with chemicals. Work in a well ventilated area, consider using a respirator, and wear gloves.
We’ll be working with polyester resin because of it’s quick cure time and forgiving nature. Polyester is compatible with all composite constructions other than epoxy. In the unlikely case that your kayak is laminated with epoxy resin you’ll need to use epoxy for your keel strip. This adds a bit of complexity and expense to the project. We’ll stick to polyester resin in these instructions.
Masking
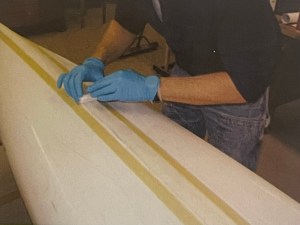
Once you’ve cleaned the hull, run a piece of 2″ masking tape down the center of the keel line from bow to stern. This will be your guide for masking the rest of the job, so make sure it’s straight. Trim the ends of the tape off square or to a point, depending on your preference. The best tape to use for this job is blue painters’ masking tape. This tape is easy to remove and won’t leave a residue of adhesive on the gel coat. It’s more expensive but well worth the added cost.

The next step is to run a strip of tape down either side of the central strip. This can be done with 2″ or 1″ tape. Hold the tape 1/4″ back from the center stripe. Finish the ends the same way you did the center strip. Once this tape is fully rubbed down to the hull you can pull the center strip and discard it. You should now have area approximately 2 1/2 inches wide masked off down the center of the kayak.
Sanding
The next step is to abrade the gel coat down the centerline of the hull. This will ensure that the polyester resin can make a strong mechanical bond with the surface. The best way to sand the hull is with a flap brush on an electric drill. Choose a brush that has nylon bristles arranged in rows around a central drum. This type of brush can be used directly over the masking tape without damaging it. Brushes with tighter bristles will damage the tape and cause all kinds of masking headaches.
Wear a dust mask while sanding. Work the brush down the center of the hull, overlapping the edges of the masking tape to insure that the entire area is fully abraded. Give the sanded area a wipe with acetone when you’re finished. Now you’re ready to finish masking.

Final Masking
The masked area that you just finished sanding will be the full width and length of the finished keel strip. But, in order to get the edge of the gel coat to adhere to the hull we need to do a little more masking.
Add a second strip of tape to both sides of the sanded area, overlapping the first tape strips and covering 1/8″ more of the sanded area on both sides of the keel strip. When you are done you will have an unmasked area about 2 1/4 inches wide down the center of the hull. This is where we’ll apply the fiberglass tape.
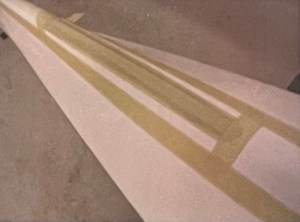
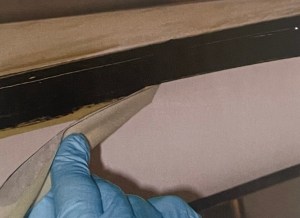
If you have a retractable skeg in your kayak you’ll want to mask the skeg box area now. This can be done in a variety of ways. Shown in the image above, the opening of the skeg box was taped over with 2 pieces of 1″ tape which was then trimmed with a utility knife. You can also adhere tape to the inside of the skeg box, leaving a raised edge around its perimeter. Either approach works. Additional strips of masking tape are added where the fiberglass tape will end in front of and behind the keel strip.
The reason we’re adding this additional masking step will be made clear as we work through the rest of the application process. In essence, we have one set of masking for the fiberglass tape, and a second set of masking for the gel coat. Both of these steps need a dry, sanded surface to adhere to, and masking this way eliminates the need to sand between applying the fiberglass layer and covering it with gel coat.
Once you’ve finished final masking, give the hull one last wipe with acetone. Now you’re ready to apply the fiberglass.
Applying the Fiberglass Tape
Roll out a piece of 2″ fiberglass or polyester tape down the centerline of the kayak and cut it to size. If you have a skeg in the boat you will need two pieces: one to run from the front of the skeg box to the bow, and a second to run from the rear of the skeg box to the stern. Roll the tape up like an ACE bandage to make it easier to apply to the hull later.
Next, mix up a batch of polyester resin and catalyst. You can use conventional hardware store resin, which contains a surfacing agent, or laminating resin, which does not. Either will work.
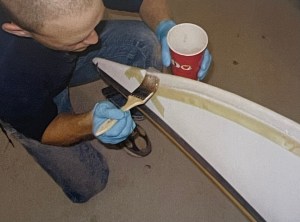
You’ll need 8-10 ounces of resin to apply the fiberglass tape. It’s best to have more than you need rather than to run out half way through the process. I like to mix a bit more catalyst into the resin that suggested in the instructions. This promotes a faster cure and makes it easier to get the fiberglass tape to adhere to the curved areas of the bow and stern.

Paint a layer of resin down the centerline of the hull, coating the entire sanded surface. An inexpensive chip brush works well for this. Roll the fiberglass tape onto the resin, starting and one end and moving toward the other. Smooth the tape down with your fingers. Now apply resin to the tape with your chip brush, starting at one and end moving toward the other. Try to keep the tape straight and work the resin into the fibers so that it becomes a uniform, translucent color. As you reach the bow and stern the tape will resist laying down smoothly. Continue working these areas until the resin begins to cure and the tape sticks to the hull.
The tape will lengthen somewhat as you brush it into place. You’ll trim it to precise size later in the process.
When all the fiberglass tape is adhered to the hull and the resin has started to cure, you can pull the second set of maskings. You want the resin to be tacky but not fully cured. Pull the masking tape across the center of the boat as you remove it. This pulls any residue from the resin back onto the fiberglass tape and creates a neat line at the edge of the strip. Remove the two cross pieces of tape near the skeg box, but leave the masking in place around the box itself.
Once the tape is pulled, you’ll have a resin-free sanded perimeter around the fiberglass tape for the gel coat to key into.
When the resin has cured enough to become almost hard or “green” you can trim the ends of the fiberglass tape to final size with a utility knife. A fresh, sharp blade is essential.
Gel Coat
Mix your gel coat as you’re completing the final stages of trimming tape and removing masking. You’ll want about 16 ounces of gel coat to complete the keel strip. Better to have more than you need, you don’t want to run out halfway through the process.
We need surfacing agent (wax) in the gel coat so that it is sealed off from oxygen as it cures. Gel coat will not fully cure in the presence oxygen.
There are a couple ways to get a surfacing agent into our gel coat mix. Some gel coat comes pre-waxed from the manufacturer. It will probably be noted as containing wax or waxed styrene on the label. If you’re ordering gel coat from a kayak company or resin supplier you can request that wax be added.
Another approach is to mix the gel coat 2:1 with waxed polyester resin. This works, but pre-waxed gel coat is best.
Of course, you can add styrene wax to unwaxed gel coat if you have it, but this is a specialty item that can be hard to find.
Now we need to thicken the gel coat so that it flows smoothly and covers the texture of the fiberglass tape. We use glass microballoons for this. Microballoons are a specialty item that you’ll need to buy from a marine supply store. Wear a dust mask when working with them. You don’t want to breathe that stuff.
Add microballoons to your gel coat and stir until you reach the consistency of thick pancake batter. You might want to experiment with a small batch of gel coat before you jump right into tackling the whole keel strip. When you have the consistency of the gel coat correct, it flows over the fiberglass tape smoothly and brush strokes disappear. If it is too thin it will run and brush strokes will show. Too thick and it won’t flow properly.
What about color? Microballoons will lighten the color of any gel coat you’re working with. If you’re using white, this isn’t a problem. But if you’re using black or red you will end up gray or pink. The solution to this is to add more pigment to the gel coat once you’ve added the microballoons. But pigment can be hard to find. Marine supply stores often stock black, white and red pigments. Sometimes pigments can be ordered from gel coat suppliers or kayak manufacturers, but not always. Sticking with white or black is usually your best option.
If you have access to pigment you can use clear gel coat and add pigment to it until it is the correct shade. Or you can start with colored gel coat and add pigment after it’s thickened.
Once your gel coat is mixed to the correct consistency and color, it’s time to add catalyst and get rolling.
Make sure you apply the gel coat to the keel strip before the fiberglass tape has fully cured. We want the gel coat to chemically bond to the resin strip, which it won’t do if the resin has cured.
If you’re using unwaxed laminating resin for your keel strip you’ll have plenty of time. This kind of resin is like unwaxed gelcoat: it doesn’t cure fully in the presence of oxygen.
If you’re using hardware store resin with wax you’ll want to time things so that you’re putting the gel coat onto the keel strip just after you pull the second set of maskings.
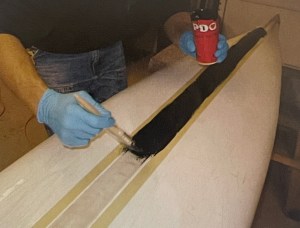
Use a 2″ wide brush to apply the gel coat mixture. A chip brush will work, but a better quality brush will be less likely to leave bristles in your finished product.
Start at one end of the keel strip and move toward the other, applying gel coat and smoothing it as you go. Work quickly so that the gel coat doesn’t begin to cure before you have it all applied to the hull. As a final step, run the brush from one end of the kayak to the other, smoothing the mixture and eliminating brush strokes.
You can remove the final masking once the gel coat begins to cure. Don’t wait too long. You want it to be slightly fluid when you pull the tape. If the gel coat is completely hardened the tape will be trapped under it and almost impossible to remove. If it’s rubbery the edge will lift and tear.
Timing is everything. Test a bit of the gel coat on the masking tape to judge when it’s time to remove the tape. You want it tacky, but not rubbery. Think molasses.
Pull the tape across the keel strip as before, rolling any gel coat residue back onto the keel strip rather than onto the clean hull.
A Note on Materials
It’s worth noting that some of the materials used to do keel strips in the UK can be difficult to find in the US. Diolen keel strips are common in the UK, where they are preferred for their increased durability. But Diolen (polyester) tape can be hard to find in the States. Likewise, waxed styrene can be hard to find. You can make your own styrene wax by shaving paraffin canning wax into styrene, (discussed here) but that assumes you can track down styrene in the first place. Buying waxed gel coat is the best option in most cases.
What about aramid (Kevlar) tape? A Kevlar keel strip certainly would be tough, but Kevlar is very difficult to cut without specialty shears. In most cases you’ll be happier working with fiberglass tape rather than wrangling Kevlar.
Project Complete
Congratulations! You’ve just completed your first keel strip. This piece of fiberglass will make your kayak much tougher and will provide a sacrificial layer to take abrasions that would otherwise damage the hull.
It may be necessary to refinish the keel strip from time to time as it wears. Simply re-mask the edge, rough up the surface with the nylon flap wheel, and apply a new layer of thickened gel coat.
Adding a keel strip is a great way to beef up an aging kayak or prepare a new boat for an ambitious trip. Don’t be afraid to tackle this project at home. The results are well worth the effort.
[One final note. The keel strip application process is exactly the same as the process used to apply a fiberglass outside seam to a kayak. You can follow these instructions (with slight modifications for the width of the fiberglass tape used) to complete a repair on a damaged outside seam.]
Materials List:
Polyester Resin
2″ Fiberglass or Diolen Tape
Gel Coat
Catalyst
Microballoons
Gel Coat Pigment
2″ Chip Brushes
2″ Painters’ Masking Tape
1″ Painters’ Masking Tape
Acetone
Utility Knife
Mixing Cups
Mixing Sticks
Paper Towels
Drill and Nylon Flap Wheel
