
Initial shakedown on a desert river trip.
A couple weeks ago I was offered the chance to join an exploratory trip down the “lowest” San Juan River in Utah. This section of river has been inundated by the Glen Canyon Dam and Lake Powell since the 1960’s. Declines in lake level have allowed about 25 miles of river to return in recent years. We paddled the river from the takeout of the Lower San Juan to the confluence of the Colorado, where we were picked up by boat and shuttled up the lake. The trip was coordinated by Cody at Tse’ Kooh Outfitters in Bluff, Utah. If you’re interested in a trip on the San Juan I hope you’ll hit him up. He’s someone you’ll want to meet.
I was excited to get back to the desert for the first time since running the Yampa in the early-2000’s. On that trip and my previous run down the Grand Canyon I’d slept out in an Outdoor Research Alpine Bivy. It was the perfect solution for desert camping, but I sold it years ago. I needed another bivy bag.
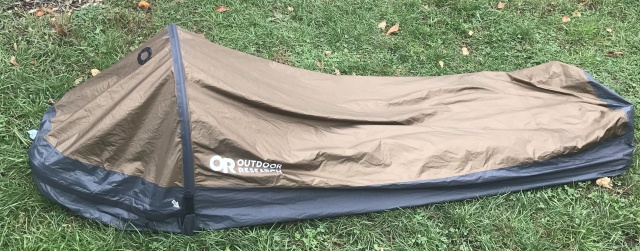
A quick bit of research pointed me to the Outdoor Research Helium Bivy. Online reviews were generally favorable, it was lighter than my Alpine Bivy and looked substantially similar. Price was 200 bucks–a third less than my old Alpine. And it came in a nice, earthy, coyote brown color. Worth a shot. A few clicks later I had one on the way 3-day Priority Mail. Time to put it to the test.

Design
The Helium Bivy is similar to the old Alpine, but not identical. The Alpine was a two-pole design that used snaps to tension the hoops. It worked great, but had a bunch of parts to lose. The Helium uses a single pole with no snaps and a minimum of bits. Both share a simple, zipped opening at the head of the bag and a section of noseeum mesh for ventilation. In the Alpine this mesh was secured with two separate zippers, one top and one bottom, both of which were separating in the event you wanted to leave the mesh at home. The Helium is simpler and cleaner.
The top of the Helium Bivy is sewn from 2.5-layer Pertex Diamond Fuse waterproof/breathable fabric, a variant of Pertex Shield. This fabric is much lighter than the 3-layer Gore-Tex used in the Alpine Bivy. The floor of the Helium is lighter than the old-style OR white urethane waterproof coating as well. Combined, these two fabrics cut the weight of the Helium by a third or more compared to my old bivy.
Details on Pertex Shield are hard to come by. The official Pertex Shield web page offers scant details. Best I can tell from researching the web is that Shield fabrics use a polyurethane coating to achieve a waterproofness of 20,000mm, which puts it solidly in the waterproof zone and similar to other lightweight coated waterproof fabrics. By comparison, Gore-Tex fabrics start at about 28,000mm of waterproofness and go up from there. In theory, Pertex shield breathes as well as Gore-Tex, with a comparable lab-measured breathability.

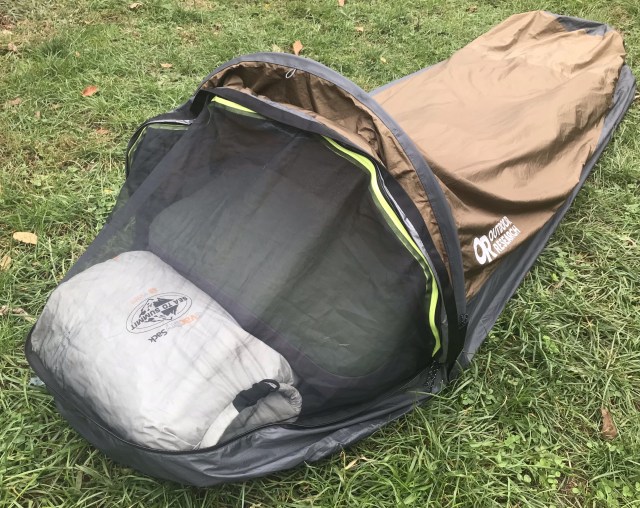
The Helium uses a lightweight fiberglass pole that slides in from one side and secures with a velcro flap. With a sleeping pad and some gear inside the bivy, this pole does a good job of creating a little space to keep the bag off your face. There are two stake out points on the bivy, one at the head and one at the foot, and a single tie-out loop at the top center of the pole sleeve that would allow you to guy out the bag should the need arise. I doubt this is a feature that I’ll ever use, because it would make it more difficult to enter and exit the bag.

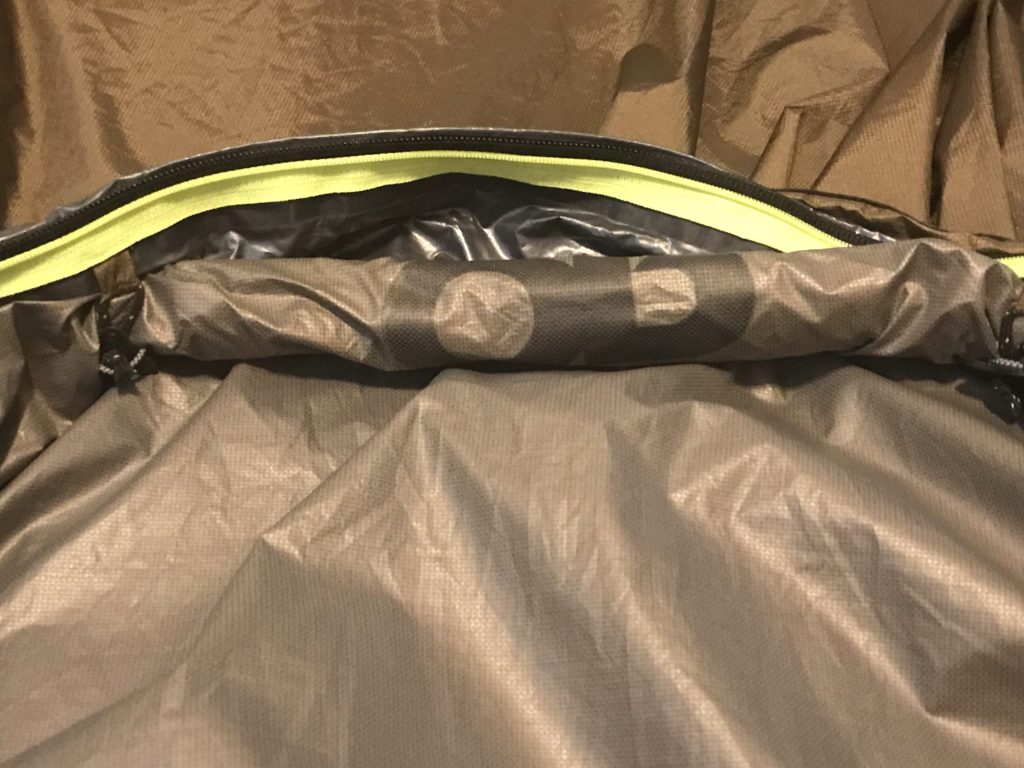
Two color-coded zippers seal the opening of the bag. The first secures the noseeum mesh to the top edge of the storm flap. The second seals the flap completely in the event of serious rain. A combination of mosquitoes and a late-night thunderstorm gave me the opportunity to put both to the test.
One of the more unusual design features of the Helium Bivy is the way you adjust the opening of the bag to allow ventilation. Two loops of cord hang down from the underside of the pole sleeve inside the bivy. To pull back the waterproof cover of the bivy and get a little breeze you secure two triangular plastic buttons into these loops. This forms a tuck in the waterproof fabric and exposes the mesh. It takes a little practice to learn how to do this correctly. If you don’t, a flap of fabric hangs down into the opening of the bivy, obstructing ventilation.
Setup
The chief benefit of a bivy bag is how simple they are to set up. The Helium is no exception. Slide the pole into the sleeve, secure the velcro flap and you’re done. Insert sleeping pad and bag and you’re ready to start counting sheep.
That said, there are some tricks to getting the most out of a single pole bivy like the Helium. If you don’t do something to tension the bag from head to toe the pole will flop over, reducing internal breathing room. You could try to stake out the bag using the loops at the head and foot, but this does take away from the simplicity and pitch-ability of a bivy bag. On my Grand Canyon trip I slept on a locker on my raft every night. No place for stakes there. Setup on other hard surfaces offer similar challenges.
Instead of staking, the best way to tension the Helium is to jam your sleeping pad all the way down to the foot of the bag and put a stuff sack full of clothes inside the opening. Once I slid down into the bag I pushed this stuff sack against the head of the bivy. This kept the pole nicely vertical.

Entry and Exit
Like the Alpine, the Helium Bivy is entered by sliding your feet down into the bag from the top. This takes a little getting used to, but helps keep weight down and weather resistance high. I did find that the opening was large enough that I could pull my knees up when entering and exiting the bivy, which made the procedure a bit more convenient. If you need to be able to get into and out of your bivy sack quickly, the Helium might not be the best choice, but for most part, the small opening doesn’t present much of a problem.

Rain and Bugs
Our first night on the river offered up a good test of the waterproofness and breathability of the Helium. I started the night with the noseeum mesh deployed to fend off a swarm of hungry mosquitoes. Ventilation was decent. With my feet at the foot of the bag, the pole held the mesh off my face. The the only problem was the tucked piece of waterproof fabric. It hung down into the opening of the noseeum mesh and depending on whether I was laying on my back or my side it would touch my face. It didn’t seem right.
What I’ve learned by experimenting since I got home is that you need to tightly roll the outer fabric before you secure it with the triangular buttons. If you do this, it doesn’t hang down into the opening at all and you get full ventilation from the mesh. It takes a little practice to get the hang of it, but when you do, it works. My problem was operator error.

Sometime in the middle of the night I woke to raindrops hitting my face. Time to batten the hatches. I undid the buttons and zipped the main flap shut, leaving a small gap for air flow. Waterproof/breathable fabrics aren’t air permeable, so it’s always a good idea to allow for a little gap when you zip up. If you don’t you’ll end up choking on your own fumes. Flap secured, I rolled over and went back to sleep. Rain pounded on the waterproof shell of the bivy. Inside I was dry. Definitely waterproof.
By morning, however, things had gotten distinctly swampy. Breathing pumps tons of moisture from your body into the atmosphere, and in that enclosed space whatever breathability the Pertex had was rapidly overwhelmed. On top of this, the cool air outside created an abrupt temperature gradient at the outer shell that caused condensation inside the bag. Tucked inside my Climashield quilt I was dry as a bone, but if bare skin touched the bivy it felt distinctly wet.
This is not something I remember from the Alpine bivy and I think I know the reason why. The Alpine used 3-layer Gore-Tex with a fabric scrim on the inside. The 2.5-layer Pertex fabric is lighter because it doesn’t have this scrim, but the advantage of the 3-layer fabric is that the scrim absorbs moisture. This makes the inside of the bag feel dryer, even though the two waterproof fabrics offer similar breathability.
On my Grand Canyon trip I forgot the poles for my Alpine Bivy and spent three weeks sleeping in it without. The fabric was frequently in contact with my skin and I spent a couple nights weathering downpours with the bag zipped shut and my face near the gap I left in the zipper. Not pleasant, but I suspect it would be downright miserable in the Helium. Best not forget the pole…
At any rate, when I woke and crawled out of the Helium in the morning the outer fabric of my quilt was soaked. Nothing a quick airing out wouldn’t fix, but another reason that I prefer synthetic to down. A few days of that with a down bag would significantly cut down on the bag’s loft and insulation.
My second night in the Helium confirmed my suspicion that the issue was breathing, not breathability. Our second campsite was bug-free and the night was clear. I slept with the bivy fully open and the pole laid down flat across my chest. When I woke in the morning the outer shell of my quilt was dry. This tells me that the Pertex fabric is plenty breathable to pass perspiration from your body through the waterproof membrane. The issue is respiration, not perspiration. Unfortunately, there’s no way around breathing, so rainy nights in the Helium are apt to be a touch damp.
I do want to reiterate that I was dry inside my quilt despite the condensation. A little condensation isn’t the end of the world, but for comfort’s sake it’s best to have something between your skin and the shell of the bivy, even if it’s just a silkweight baselayer.
The Verdict
I’ve only got a couple nights in the Helium Bivy, but the range of weather that I experienced in that time give me a good idea of how well it will perform for the long term. Overall, it gets a solid passing grade and will definitely become part of my permanent kit for sea kayaking, or desert trips, or anytime I want the ability to lay out a bedroll at the end of a long day and rack out with a minimum of fuss.
I do miss the 3-layer fabric of the Alpine Bivy. It does a better job of moisture management in wet conditions and doesn’t seem to add a huge amount of weight and bulk to the bivy. Maybe a future version of the Helium will incorporate a 3-layer version of Pertex Shield. I think the tradeoff in liveability would be worth a little increase in weight.

I don’t really miss the 2-pole design of the Alpine. Now that I have the hang of rolling and securing the shell of the Helium and tensioning the bivy with gear, I’m satisfied with the way the bag ventilates and keeps the fabric off my face. It’s simple and it works. No complaints.
Is it right for you? That depends. In my opinion, bivy bags are appropriate for a very specific range of applications. In most cases, I prefer an ultralight sil-poly tarp with a bug liner as necessary. This combination is much more versatile and liveable for extended time in the field. Where bivy bags shine is in simplicity and what we might call “grunge” camping. You can lay out a bivy bag on a cobblestone beach at the end of a thirty mile day of sea kayaking and catch 5 hours of sleep before the tide is right. And you can sling a bivy out on a rock outcrop that would never allow a tight tarp pitch. They’re right for the spaces in-between conventional campsites and they give you the ability to sleep anywhere at any time in any weather.
If that’s what you’re looking for, the Helium ticks all the boxes. It’s weatherproof. It has bug netting to keep the skeeters off your face. It’s quick to set up and has a minimum of moving parts. It will get the job done. Without blowing a huge hole in your wallet.
That said, I would advise using synthetic sleep gear in the event that you need to button up and weather a storm. Condensation will be an issue if you need to keep your head inside the bag all night. As long as you accept this and plan accordingly you won’t be disappointed.
As for me? Like I said, it’s earned a permanent slot in my packout. If I’m headed to the desert or the sea, the Helium will be on the list. It’s a solid piece of gear that addresses a specific set of conditions. Simple, fast and effective. If you’re looking for a minimalist solution to backcountry camping it’s well worth a look.

If you enjoyed this post, please consider subscribing to Kitchi-Gami.com by using one of the links in the menu on the right side of the screen. On your mobile device you’ll find the links if you scroll to the bottom of the page. Thanks!

I was seriously considering one of these for a Gravel Bar Canoe Camping river trip that was discussed but never executed. Good write up. If that trip happens in the future I will definitely be hooking myself up with one.
Thanks Andy. It definitely gets the job done. Perfect for that kind of trip.
That weight is a bit more ten I expected. My tarp and bug net bivy is about 13oz and I have a ton of room under my tarp. Other then being easier to set up, I’m not sure there is an advantage to this.
Just depends on the application. I prefer a tarp most of the time. Sometimes a bivy works better.