
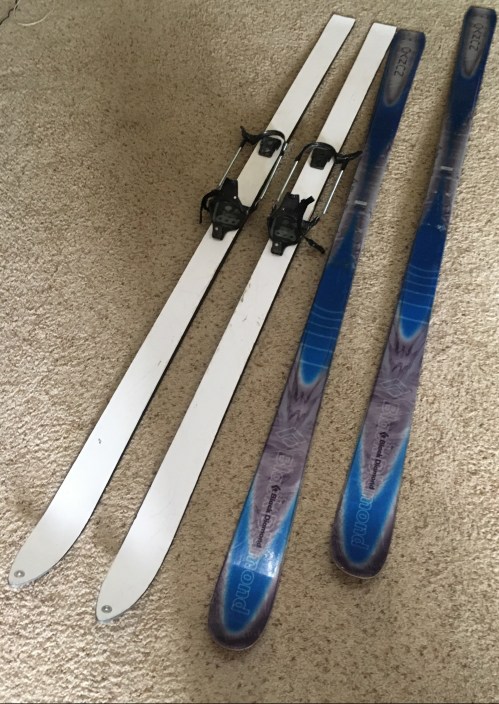
Out with the old, in with the old. Switching Voile 3-Pin Cable bindings from my old beater skis to my new beater skis…
I’m not a telemark skier. What I mean is, I’m a guy who tele skis once in a while, but I’m not that good, and I’m not too committed. Might be because I never skied alpine as a kid, so I never got into downhill ski culture.
I was always excited about skiing and as soon as my feet were big enough I started borrowing my dad’s giant Skilom Nordic skis anytime it snowed enough that I could cruise around our neighborhood in Kenosha. Our family wasn’t really into winter sports but I had fun and learned a little bit about cross country skiing. Enough that when I saw images of people Nordic ski touring in Backpacker Magazine I knew I wanted to give it a try.
I read that magazine sometime in the early 1990s. Inside were reviews of the cutting-edge backcountry skis of the day: Tua Wilderness, Karhu XCD GT, Fischer Outback. I had just started working at Life Tools in Green Bay, WI. The guys there were way into winter camping and hosted Telefest, an annual telemark ski rendezvous at the Porcupine Mountains Ski Area each winter. I was excited about winter camping and backcountry touring, so I reckoned I had to figure out how to make backcountry turns on skinny skis. It was more a “telemark for the sake of touring” sort of thing.
At any rate, I did eventually get the hang of the tele turn and learned enough that I could make it down the ski hill with a minimum of carnage. I got real good at crashing in a controlled way and I never skied faster than I wanted to hit a tree.
Since I was never really committed to on-area tele skiing, I never forked over the cash for plastic telemark boots. I learned to ski tele BP (before plastic) and I remember when the first Terminator boots showed up in our shop, but switching to plastic just wan’t a priority for me. At the time, plastic didn’t really fit with my idea of touring for turns, and I was always on a shop-guy budget.
[Don’t get me wrong. I don’t want to come across as some kind of Retro Grouch. I WISH I bought a pair of T2’s a decade ago. I just didn’t].
I did eventually buy a pair of leather boots with a plastic cuff and a couple buckles to replace my hand-me-down Asolo Extremes. I put these together with some Army surplus 190 cm Karhu Catamounts and that was my rig until 2008. Then I moved to North Carolina and didn’t spend a day on tele skis for 9 years. In the meantime, the world turned to plastic and telemark gear left me behind. Waaaay behind.

Sometime in those 9 years, my friend Todd gave me a used pair of Black Diamond Nunyo tele skis. As much as I can tell, the Nunyos are now considered almost as archaic as the Karhu XCD GTs I used to make my first turns. They were out of style 6 years ago when I got them, but I’m sure they’ll ski better than my mil-surp snow camo sticks. They also have the advantage of being narrow enough at the waist that I should be able to turn them in leathers with no lift.
I’ve sat on these skis for years, but for the past couple weeks I’ve had tele on the brain . This weekend, I decided to swap my old bindings off the Catamounts and onto the Nunyos to see if I can make them work on the hill. I did a few quick searches on the web for advice, downloaded and printed a Voile template, and jumped into the project.
First step was to fill the old binding holes in the Nunyos. After reading a discussion of epoxy adhesives and ski cores on the Wild Snow blog, I decided to use 5-minute epoxy both to seal the holes and bond the screws for the new bindings. Turns out epoxy won’t melt foam cores like they always said it would. Whoda thunk?

Holes filled I switched to getting the old screws out of the Catamounts. I was pretty sure I had epoxied those screws, so I followed a tip from the Wild Snow blog and heated the head of each screw with a soldering iron to break the bond on the screws. All screws backed out easily.
Next step was the most critical and most confusing. Where to mount the bindings?? Back in the day at Life Tools I mounted a bunch of backcountry skis. The rule of thumb was to mount at the balance point for skinnier touring skis, and at the chord center for tele-specific boards. Now I learned that skis can also be mounted at the boot sole center, and that newer skis with more sidecut have balance points that can be way off the boot center mark. I figured I needed to do some measuring and then take a wild guess.

My first measurement was the center line of the ski. Next, I found the balance point of each ski, which was about 3/4 inch forward of center. The balance points were slightly different so I marked the forward most measurement to insure that both skis would be slightly tail heavy if I were to mount the pins at this line.
My final measurement was boot center. I measured the sole of my boot from nose to heel (excluding duck bill) and made a mark on the edge of the sole.
Using these three marks I started to work up an educated guess. What I discovered is that, with the pin line of the boots set on the balance point of the skis, the boot center matched up with the boot center mark on the skis. Problem solved. I would mount at the boot center AND the balance point.


Once I made up my mind about where the pins would go, I measured and measured again to insure that both skis were mounted at the same point. Then I laid the binding template over the ski and carefully aligned the orienting marks to make sure the holes were properly aligned and centered on the ski. Satisfied, I taped the template in place and got ready to drill.


A 3.5mm drill bit is recommended for drilling skis that don’t have metal top sheets. I went with a 9/64 bit that comes in at 3.6mm and taped a spacer to the bit to prevent overdrilling. I drilled the three holes for the binding, removed the template and screwed the binding to the ski.
Next step was to add the heel plate. This I did by eyeball. I clamped a boot into the binding, aligned the heel plate so that it was centered under the heel of the boot, and removed the boot. With boot in place, I centered the plate by eye and held it by hand while I used a Sharpie to mark the position of the holes. Once the holes were marked I drilled and screwed the plate into position.

The final step in installation was to remove all the screws and epoxy them in place. I backed the screws out, filled the holes with epoxy, and tightened them until firmly seated.
The second ski was done in exactly the same manner with a couple of additional measurements. I measured from the tip of the ski to the front of the mounted binding when I was taping the template to the second ski. This insured that the second binding would be mounted in exactly the same position as the first. My measurements were inside a 16th of an inch. Once the binding was mounted I measured from the back edge of the binding to the rear of the mounted heel plate to insure that both heel plates would be mounted the same distance from the pins.

In all, the process went pretty smoothly. I hadn’t ever mounted bindings without a jig, and while a jig is confidence inspiring, there’s no reason that you can’t mount them at home with a template if you’re careful with your measurements.
So now I have a pair of newer old skis to drive with my old school leather boots. All that’s left to do is get out on the hill and see if I still remember how to make these things turn. If I do, I may head back up to the Porkies this winter. Telefest is still going strong.


If you enjoyed this post, please consider subscribing to Kitchi-Gami.com by using one of the links in the menu on the right side of the screen. On your mobile device you’ll find the links if you scroll to the bottom of the page. Thanks!

hi Brian
glad to see you are still alive bob herubin
bobherubin1958@gmail.com
Still kickin Bob!