
Taking a crack at a new stove base for my Whisperlite.
Last February I did a week long solo trip in the Boundary Waters. I had my Kifaru Tipi and collapsible wood stove, but I also brought an MSR Whisperlite International along so that I would be able to melt snow and boil water regardless of whether the wood stove was assembled and burning hot.
The International was a new stove to me and I didn’t bother to see if it would fit on the MSR Trillium Stove Base that I had used with my Dragonfly stove. Once on the trip I learned that my old Trillium isn’t compatible with the newer style stove legs on the International. The base worked OK, but it never was really secure, and I decided that I would try to work up an alternative before my next winter adventure.
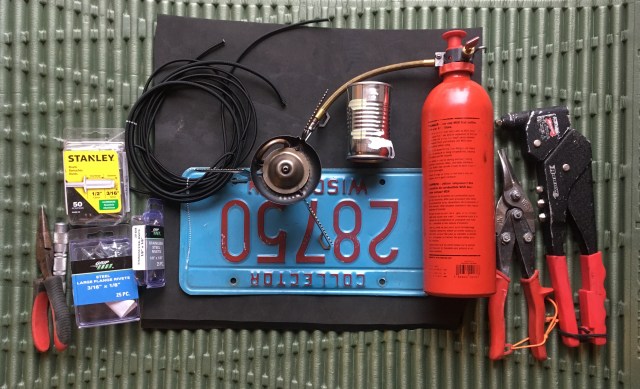
I’m gearing up for a quick trip at the end of this month, so I grabbed an old license plate from my gear pile and got to work.
It took several sketches before I came up with something that I thought might work. I knew I wanted both the stove and fuel bottle to be securely locked to the base. I also planned to add a thin piece of minicell foam to the back of the license plate to help slow the rate of melting on the snow when the stove was running.

My initial idea to secure the stove to the base was to drill three holes through the plate to accept the tabs at the base of each stove leg. Unfortunately, the stove base itself turned out to be wider than I had expected, so I wouldn’t be able to drill holes large enough to accept the legs. As an alternative, decided to use some kind of clamp arrangement.
To secure the fuel bottle I would use two of the existing holes in the license plate and add two more that would allow me to string a length of bungee cord that could be tensioned with a cordlock to clamp the bottle in place.

First step was to test fit the stove onto the license plate and mark out the position of the holes that I would need to drill. I planned to do this project with parts I could dig up at home, which meant I would be using some oddball rivets and parts from my tool bag. This plan necessitated the use of three drill bits: 1/8, 3/16 and 1/4.
First, I aligned the stove so that one leg pointed away from the fuel bottle. This leg was to be clamped in place by some kind of metal tab. I marked the position that the tab would take and the hole that would secure the tab. Next, I marked two small holes at each of the other two legs. These legs would be partially secured by hooking against small rivets that I would fit from beneath the plate. Finally, I marked the two additional holes for the bungee cord and two holes that would secure the foam pad near the stove end of the license plate.

Holes marked, I started drilling, using a piece of scrap wood as a backer so I wouldn’t drill into my work table. I drilled the tab hole and holes to secure the foam pad with a 3/16 inch bit. The holes to hold the legs were drilled with a 1/8 inch bit, and the holes for bungee cord were drilled with a 1/4 inch bit.

Once the holes were drilled, I set to work trying to fabricate a tab that would be stiff enough to hold the stove leg in place. My first try involved cutting up a tomato paste can and folding and refolding the metal into different configurations. None of my experiments proved stiff enough to secure the stove leg, so in the end I used a stout picture hook from our kitchen toolbox. I bent the hook almost straight and riveted the tab in place with a 3/16 rivet and a backing washer.
Next step was to place two 1/8 inch rivets through the holes that would “locate” the other two legs. I only had short rivets, so I wasn’t so sure how well the resulting pins would interact with the stove legs, but it was worth a shot.
Once the clamp and pins were in place, I cut a piece of 1/4 inch, high density minicell foam to put onto the back of the plate. I secured this foam from the backside with two wide-head rivets backed by washers. The foam compressed enough that I couldn’t get the rivets to break off, so I cut them with a pair of diagonal cutters and used a file to smooth down the burrs.

Foam secured, I set to work threading bungee cord through the holes at the other end of the plate. I ran a 1/4 inch drill bit though the foam to make it easier to thread the cord. My first attempt was with 1/4 inch bungee cord, but I couldn’t find a cord lock in my sewing box large enough to use on this cord. I switched over to 3/16 cord and threaded the bungee so that it secured the foam to the bottom of the plate when tensioned. A cord lock completed the bottle end of the stove base.

The stove base was complete and ready for a test run. After a bit of fiddling I realized that I needed to bend the stove clamp a little flatter to help it engage with the stove leg. I also learned that the best way to secure the stove to the base was to first clamp the fuel bottle in place, then hook the stove under the leg clamp, and finally connect the stove to the fuel bottle.
Initial impressions are that the stove and bottle are definitely secure. One of the two stove legs closest to the bottle effectively connects with the locator pin and is held in place by a little bit of tension from the fuel line. The other pin doesn’t really hit the leg and adds little to the design. It’s obvious that longer rivets would serve better as pins, but the whole rig seems secure enough that I don’t think I’ll bother to replace the pins.

Overall weight of the base is 5 ounces, which is three ounces heavier than the Trillium base that it replaces, but given that I usually carried a chunk of minicell foam to put under the Trillium, I think field weight is likely to come out to a wash. The new base is larger than a folded Trillium, but plenty compact enough to slide into a pack regardless of how fully it is stuffed.

In all, I’m satisfied with how this project came out, and I’m looking forward to getting the new stove base out on the trail for a full shakedown. I’ll update this post after my trip in early February to report on how well it works.

If you enjoyed this post, please consider subscribing to Kitchi-Gami.com by using one of the links in the menu on the right side of the screen. On your mobile device you’ll find the links if you scroll to the bottom of the page. Thanks!

Did you steal the license plate off my ‘67 El Camino?
It’s a classic!